Automate data processing and reporting with coding assistants
With the advent of large language model (LLM) coding assistants developing software and novel reports has never been easier. We now provide a coding skill for LLMs that allows the coding assistant to interact with Mascot Server, automate tasks and generate custom reports. Although LLMs are well known to hallucinate, the coding skill combined with good planning of the experimental analysis will avoid most issues.
The Mascot Server search algorithm, Distiller quantitation and Daemon automation are long lived products that were developed before the advent of LLMs, but each product has been designed to be scriptable. The software library we use for interfacing with Mascot Server is Mascot Parser, originally released 2002 and updated with every new version of Mascot Server. It is available for free for use with your own pipelines and projects.
Although we have documented using Mascot Parser to create your own data analysis pipelines(1,2) we have noted that you needed reasonable proficiency in your chosen programming language. You can now teach LLMs to use Mascot Parser by directing them to the documentation and example code, included with the Mascot Parser download. The example skill that can be downloaded from our GitHub repository and used with different LLM coding agents, which speeds up the process.
Once the skill is installed you can use an LLM to interact with Mascot Server. Anything that can be programmed with the LLM, from simple automation tasks to complex mining and merging of results from any files, is possible. More importantly, there are a number of ways to trigger actions while processing data, known as hooks.
Mascot Server post search hook
In the Mascot Server mascot.dat configuration file there is a hook that you can use to run a process on the Mascot Server itself. This runs independently from the way the search was submitted and will run on every search. The option is called ExecAfterSearch. It only provides two run time parameters: %resultfilepath, %resultfilename but you could include additional non variable parameters in a configuration file. A great example usage for this would be to run a QC report on every search with a command like this:
ExecAfterSearch_0 waitfor:0;logging:3, Running QC, ../bin/my_qc_script.exe %resultfilepath
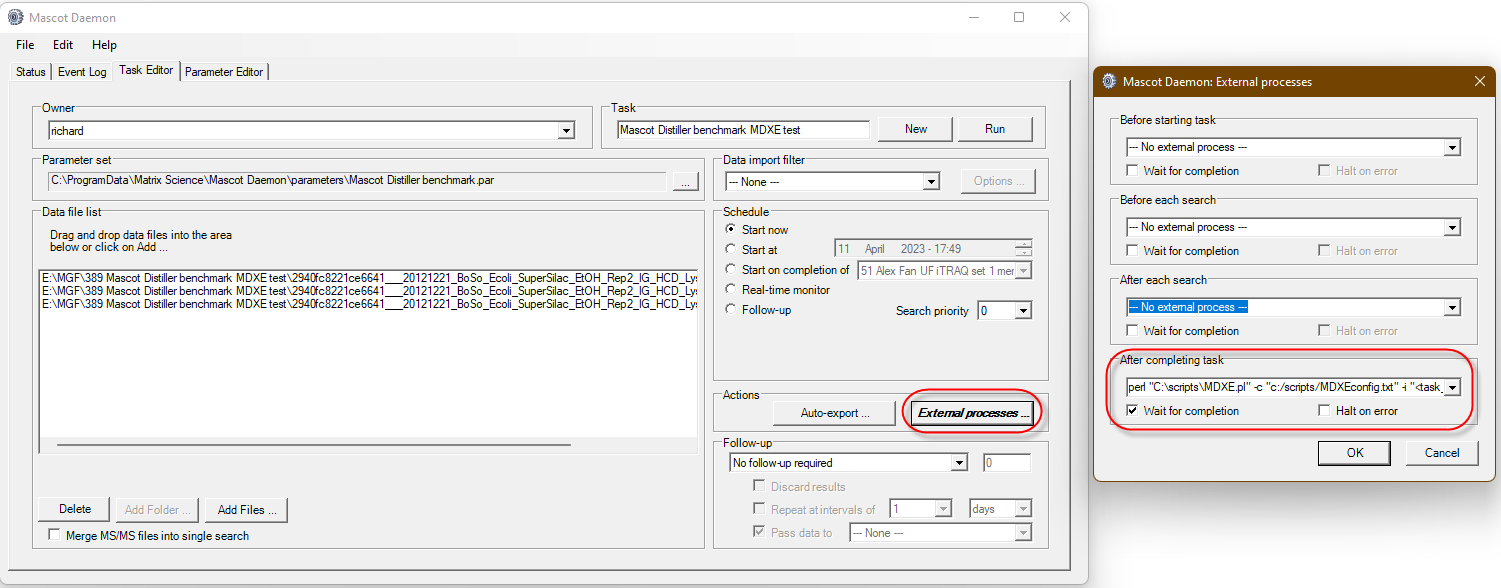
Mascot Daemon External Processes
Mascot Daemon providers a wider range of hooks allowing you to run scripts:
- Before starting task
- Before each Search
- After each search
- After completing task
In most cases you want to select “Wait for completion” especially if you are preprocessing peak lists before searching. You may want to “Halt on error” or continue to the next one depending on the final goals of the automation.
Before starting task
I haven’t found much use for this hook as it happens before any work is done. One use case is to pop up a message to say the task has started. This can be helpful if you are waiting to “start on completion of” an earlier task. You can also use it to insert data into a database or other tracking software recording the task number and date it started.
Before each Search
Now we’re talking! This is the step post peak picking before the search starts. This gives us an opportunity to manipulate the peak list before each search. A good example is the TMTpro™ complementary ions script that processes the MGF file before searching and moves the complementary ions from close to the precursor mass, transforming them to the traditional reporter ion region.
After each search
This is the traditional starting point for process search results after the search has completed. In the past I have used this for exporting after search completion or triggering some other sort of result processing or reporting.
After completing task
Much like the “After each search” hook there are search results output that you can work with. You can process individual files, but the real power is to work with a batch of results from the task. The hook receives the location of the results and then have your program read the files names at this location and assemble the batch. When working with a batch it allows you to create merged results from the data set or send messages that the task has finished. An example that uses this hook is the Mascot Daemon Export Extender that can auto export Mascot Distiller quantitation reports and is extendable to run any custom script.
Runtime substitution tags
There are also 17 parameters that are substituted at run time. A complete description is in the Mascot Daemon help (press F1) and navigate to the Reference->External Processes Dialog section. In brief the command line string can contain the following tags, which are substituted at run time.
|
Tag |
Availability |
Description |
|
<taskname> |
All hooks |
Task label |
|
<parameters> |
All hooks |
Parameter set path |
|
<localhost> |
All hooks |
Windows computer name |
|
<localuser> |
All hooks |
Windows user login name |
|
<task_directory> |
All hooks |
Path to the Daemon cache directory |
|
<mascot_user_id> |
All hooks * |
Mascot security user ID |
|
<mascot_user_name> |
All hooks * |
Mascot security user name (e.g. jdoe) |
|
<mascot_user_full_name> |
All hooks * |
Mascot security user full name (e.g. John Doe) |
|
<mascot_user_email> |
All hooks * |
Mascot security user email address |
|
<datafilename> |
Before / After each search |
Data file name |
|
<datafilepath> |
Before / After each search |
Path to the data file |
|
<cachedpeaklist> |
Before / After each search |
Path to peak list saved by data import filter (if any) |
|
<samplenumber> |
Before / After each search |
Sample number (if any) |
|
<resulturl> |
After each search only |
Full URL to Mascot results (e.g. http://localhost/mascot/cgi/master_results.pl?file=../data/20140123/F235567.dat) |
|
<resultfilename> |
After each search only |
Result file name (e.g. F235567.dat) |
|
<resultfilepath> |
After each search only |
Relative path to result file (e.g. ../data/20140123/F235567.dat) |
|
<exportfilepath> |
After each search only |
Path to results export file (if any) |
* The <mascot_user_*> tags are only populated when Mascot Server security is enabled.
Creating custom reports
Now the fun part. You now know where you can call a custom script so the question is how you call a script and make something that does what you want. For this example we want to create a report that visualizes some of the results. The Python scripting language has some nice libraries for creating plots and visualizations. Download Mascot Parser and the skill that tells the AI coding agent how to use it. I’m going to use Anthropic Claude AI agent but you could just as easily use ChatGPT, Copilot, Gemini, Codex, Cursor, Replit, (insert your favorite tool here). I want to make a 2D plot of retention time vs m/z and the identification rate. A simple 2D plot will work but I also want to dress it up a little and make it look nice but still be informative.
I made a plan of what I wanted, listing the plots, their axis, styles, and color palette. I asked the agent use the /mascot-parser skill and to refine the plan filling in any gaps. The agent then went ahead and wrote the script and ran some tests. I fine-tuned the script, requesting changes in plot positioning and specifying a different color palette for the hexbin plot. The end result was a script that can be used with Mascot Daemon or run on the command line directly. It is not always obvious how to do this so I have included a summary of the transcript that shows my input, Claudes replies and a consolidated prompt that will build something similar with a lot less iterations. The example QC script is also available from our GitHub repository.
As a quick test I used a DDA search result from a LFQ standard taken from PRIDE project PXD028735, using file LFQ_Orbitrap_DDA_Condition_A_Sample_Alpha_02.raw. I used the external process and the “After Each Search” hook, entering the script command:
C:\Path_to_python\python.exe "C:\scripts\mascot_qc_report.py" "<resulturl>" "<task_directory>"
Once the search completed Daemon called the script and generated the plots as a single image ready for review and use.
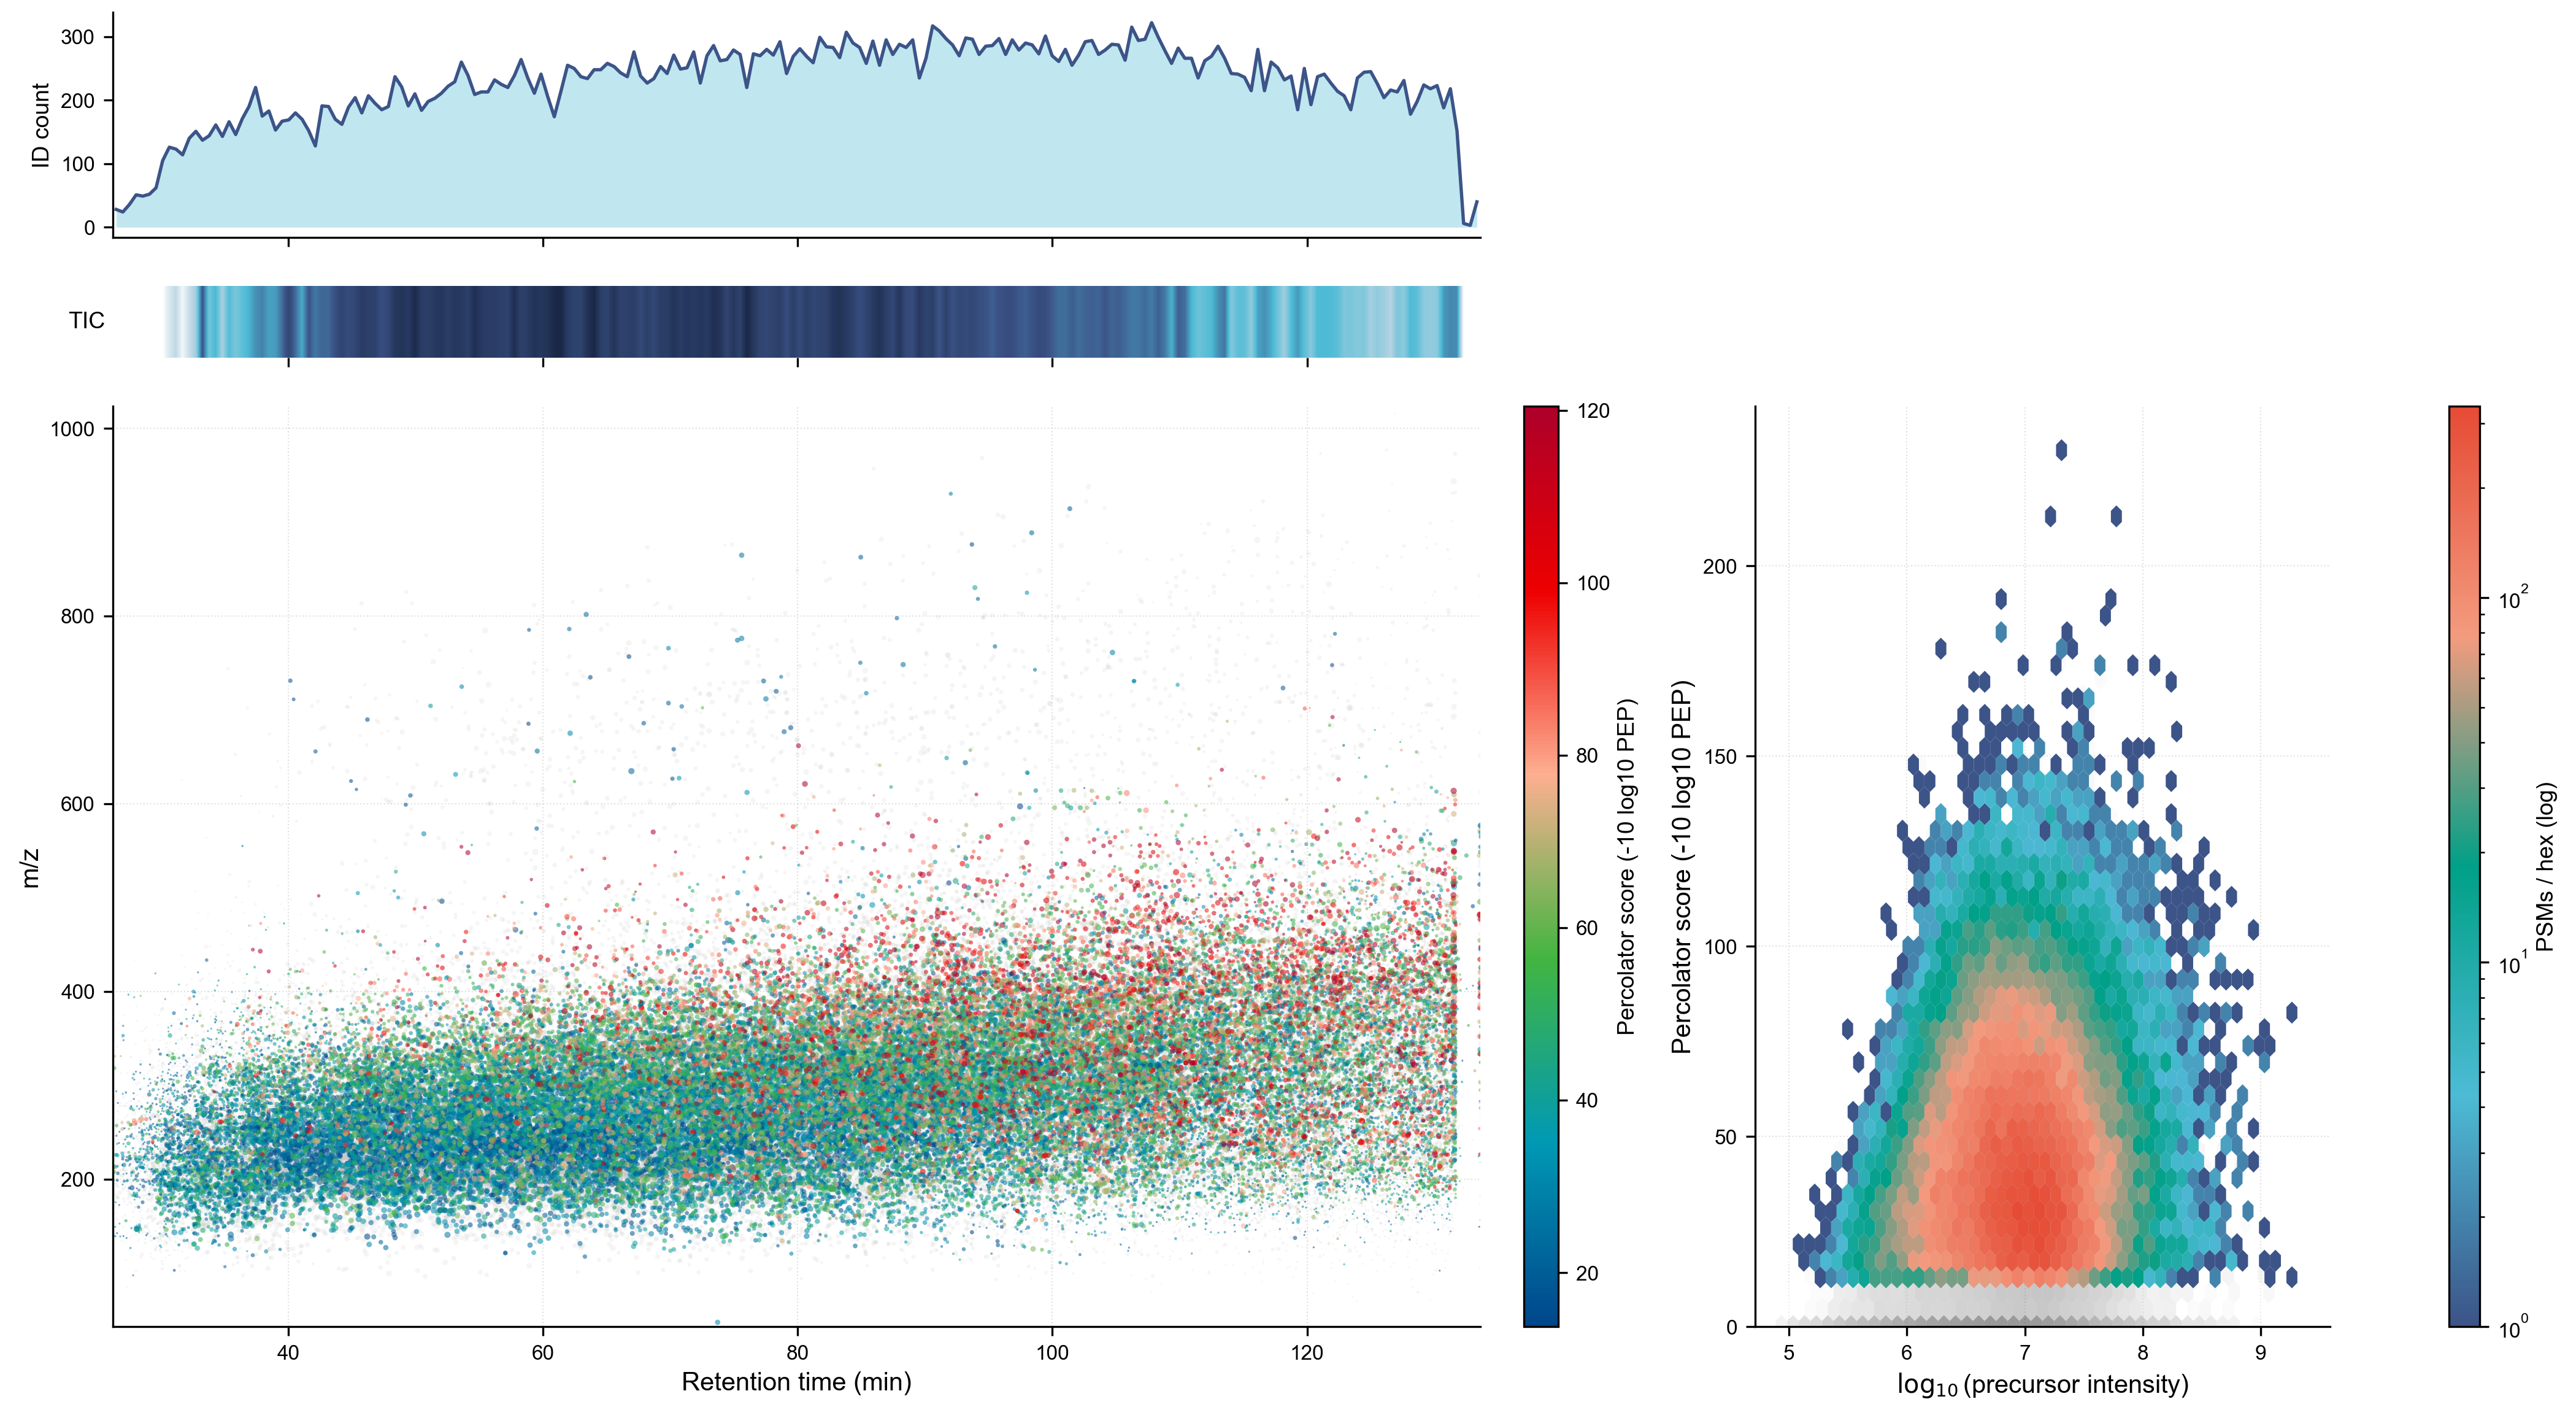
Left Top: ID count histogram by RT — shows the identification density across the gradient, with a clear productive window from ~10–130 min peaking around 50–100 min
Left Middle: TIC heatmap strip — a compact 1D gel-like representation of total ion current, which shows signal density without taking up much vertical space
Left Bottom: RT vs. m/z scatter with points colored by Percolator score (blue→green→red colormap). The gray points are unidentified scans and not east to see as the identified ones are plotted over them and the identification rate is ~50%.
Right panel: log₁₀ precursor intensity vs. Percolator score with a log-scale PSM count colorbar. The hot core (red/orange) sits right around 10⁷ intensity and score ~20–75. A right skew toward high intensity with correspondingly high scores is visible but not dramatic. For the most part precursor intensity does not affect peptide identification too much.
One can do a lot more useful things than this example. This could be expanded into a complete QC analysis suite or one could make a more specialized report on say variable modifications or the species content in a metaproteomic analysis. We plan to take a look at some of those ideas in future blog articles.
The Mascot Server search results are robust, and we provide tools on how to mine them and get the most out of your data. Each experiment or project may require a different style of report, with the help of an LLM agent you can now create the reports of your dreams.
Let us know about the reports, tools or pipeline you have made or would like to see for the Mascot ecosystem.
Keywords: AI, automation, Mascot Daemon, QC, reports